Tuesday, June 25, 2024

ZXIO V2 Experimenters Kit Out Now

Leave a Comment


ZXIO V2 IO 8255A Experimenters Kit Parts

After working extensively on the ZXIO Blog series, I aimed to create a memory-mapped I/O board ideal for experimenting with ZX BASIC, as the ZX81 lacks the ability to use IRQ-mapped devices without resorting to machine code routines. The end result is the ZXIO V2, which is based on the use of an 8255A Programmable Peripheral Interface IC. 


Apparently, I wasn't the only one wishing for such a device. The blog series was extremely popular, and the demand for an easy-to-use I/O board for the ZX81 was high. After additional development and testing, I'm finally releasing the kit.


ZXIO V2 IO 8255A Experimenters Kit Complete
A Built ZX81 ZXIO V2 Experimenters Kit

What's in the Kit?

  • ZXIO V2 PCB and parts: The main component of the kit and brains of the operation.
  • ZX BUS Expander PCB and parts: A ZX81 BUS extension card, the ZXIO or other cards of similar design can be attached to this board.
  • ZX IO LED Board and parts: A unique expansion board designed to be mounted directly to the ZXIO V2 expansion headers. 
  • ZXIO Breakout Board and parts: Designed to be used in conjunction with a breadboard for experimentation and prototyping. (Breadboard not included). 
  • IDC ribbon Cable.
The kits contain everything needed to build the base ZXIO V2 board, including an LED board and a breakout board. All parts are brand new, with the exception of the 8255A IC, which is a reclaimed component. This decision was made to manage costs effectively; sourcing new versions of this IC would significantly increase the kit price, potentially doubling it.

Support and Future Projects

As with the ZX-Key Keyboard before, the ZXIO V2 has a dedicated support page where updates and detailed information about the device will be posted. This page will include comprehensive build instructions, troubleshooting tips, and other relevant details to assist users in assembling and using their kits.

After the initial release, I'm planning additional posts and new projects centred around the ZXIO V2 and its usage.

Where to get a Kit?

Kits will be available at Sell My Retro, at the time of writing priced at $98 USD plus shipping.

Hope all will enjoy building abd experimenting with this ZX81 kit, and I'd love to hear about experiments and / or even host some ideas on this site. Enjoy.


Read More

Saturday, May 25, 2024

Cronosoft Releases: Minoss Knossoss for the ZX81 on Tape

Leave a Comment

Cronosoft has announced the release of Minoss Knossoss for the ZX81 on Tape. You can now dive deep into the legendary labyrinth and embark on an unforgettable adventure that brings the rich mythology of ancient Minoan Crete to life on your ZX81.


ZX81 Game: Minoss Knossoss Tape Cover Art
Minoss Knossoss the ZX81 game Released on Tape by Cronosoft 

For any great release you need exceptional cover art: I produced the base artwork for the cover of the physical release, featuring a menacing Minotaur alluding to the horrors that await the adventurous archaeologist. With Simon of Cronosoft completing the stunning package design and putting the game through rigorous testing on real hardware, ensuring smooth loading from the tapes.


So now there's no excuse not to experience the thrill of the labyrinth and the beauty of retro gaming with Minoss Knossoss on your ZX81. Stay tuned for the official release date and prepare for an epic journey! 


Uncover a Copy of Minoss Knossoss


ZX81 Version


Read More

Monday, April 08, 2024

ZX81 Game: Minoss Knossoss

Leave a Comment

ZX81 Game Minoss Knossoss, Screen shot  of Minoss Knossoss Title / attract screen

Having had Tut-Tut successfully ported to numerous 8-bit systems, it feels fitting to elevate the gaming experience by launching a sequel to the original tomb-raiding puzzle adventure in the form of 'Minoss Knossoss'.


Minoan Archaeology with the ZX81

Life on the ancient history speaking circuit had grown dull. Tired of recounting your successes at the tombs of Tut-Tut, you yearned for the exciting life of a practical archaeologist. Now, in 1924, after a month's journey by tramp steamers, you arrived in Crete at the Palace of Knossos.


Initially finding little, concrete leads began emerging from your excavations, presenting opportunities too good to pass up. Ancient tales of curses and the fabled Minotaur, along with the legendary workshops of Daedalus, beckon to the grand adventurer.


Here in Crete, where the labyrinth of the Minotaur lies, with mysteries and dangers aplenty, you'll cement your reputation as the greatest archaeologist of all time, or die trying.


ZX81 Game Minoss Knossoss, Screen shot of level 1 "kephala Naos"
Can you find your way into the labyrinths beneath Knossos?

Playing the Game

Minoss Knossoss is one part puzzle, two parts arcade action. The game comprises 20 levels, with the final level being the hidden workshops of the mythical craftsman Daedalus; accessible only to those who have mastered the labyrinths (accumulated 2500 points).


Collect gems, amulets, bracelets, keys, and hourglasses to earn points. Amulets freeze the player, while bracelets halt creatures. Hourglasses award you extra time to complete a level. Completing a level requires the player to collect keys, open doors, and move blocks before finding exits to lower labyrinthine levels, all while keeping an eye out for King Minos's mythical guardians.


Labyrinth Guardians

Strategically utilise hidden crevices to evade enemies, capitalising on the predatory instincts of Harpies and Minotaurs to distract them while you unravel the puzzles.

  • Serpents: Massive snakes roam the levels. They are timid, and while they won't actively hunt you down, be cautious—cornering them may provoke a strike.
  • Harpies: With the body of a bird and the visage of a human, these winged creatures embody an avian ferocity and supernatural penchant for vengeance.
  • Minotaurs: Renowned as the ultimate terror within the labyrinth, these formidable creatures relentlessly pursue their prey, turning the maze into a deadly game of survival.

Controls

  • Keys: ‘O’ left, ‘P’ right, ‘Q’ up, ‘A’ down, 'F' to pause and ‘R’ to reset the level (at a cost).
  • Joystick / Gamepad: A Kempston standard Joystick addaptor is supported.

Sound

  • AY Sound is supported via ZON-X sound cards and compatibles such as the ZXPand+


The Making of Minoss Knossoss

Minoss Knossoss stands as the direct sequel to Tut-Tut, a game I originally crafted for Paleotronic Magazine and the Sinclair ZX Spectrum. Following its initial release, Tut-Tut underwent widespread porting to various 8-bit platforms by a diverse array of developers. Notable among them are Dave Curran for the PET, myself and Dave for the Vic20, Sheila Dixon's adaptations for the RC2014 and MSX machines, and George Beckett's rendition for the Jupiter Ace.


Having played a role in each iteration of Tut-Tut's porting process, we seized the opportunity to introduce numerous enhancements with each development cycle. However, there inevitably comes a point where further improvements reach a natural limit, paving the way for a full-fledged sequel.


ZX81 Game Minoss Knossoss,  Screen shot of level  "Teucers Bow"
Deeper into the Labyrinth, Level Teucers Bow

In essence, the gameplay of Minoss Knossoss will feel familiar to fans of its predecessor. However, the sequel introduces additional monster types, including Serpents, Harpies (with movement similar to the mummies from Tut-Tut), and, of course, Minotaurs, each contributing an extra layer of challenge. And what would be the point of new monster types without the ability to have more of them on screen at one time? Furthermore, players will encounter a new item type in the form of hourglasses, which provide valuable extra time to navigate through certain levels.


Among the less conspicuous enhancements are newfound abilities to strategically trap monsters, sparing players from potentially frustrating level restarts. Also note that, players can now enjoy the long-awaited feature of pausing the game, particularly notable feature for ZX81 users. Additionally, the playing area has been expanded, offering a more immersive gaming experience.


Behind the scenes, I've implemented enhancements to optimize how levels are stored, Refined game timing to synchronize directly with the clock cycles of the ZX81/Z80, resulting in smoother gameplay. And, of course, I've finally integrated joystick support and rudimentary sound for those fortunate enough to be using ZON-X sound cards and Kempston Joystick adapters (or emulators).


Regrettably, the one feature omitted is the level code input option, allowing players to skip completed levels. Unfortunately, due to space constraints, this feature couldn't be included. However, rest assured that it will make a comeback in future ports for other 8-bit machines—just a hint of things to come.


With all of these features and more, I hope you enjoy Minoss Knossoss.


Uncover a Copy of Minoss Knossoss


ZX81 Version


Read More

Sunday, January 07, 2024

ZXIO Interface for the ZX81: Part 6

Leave a Comment


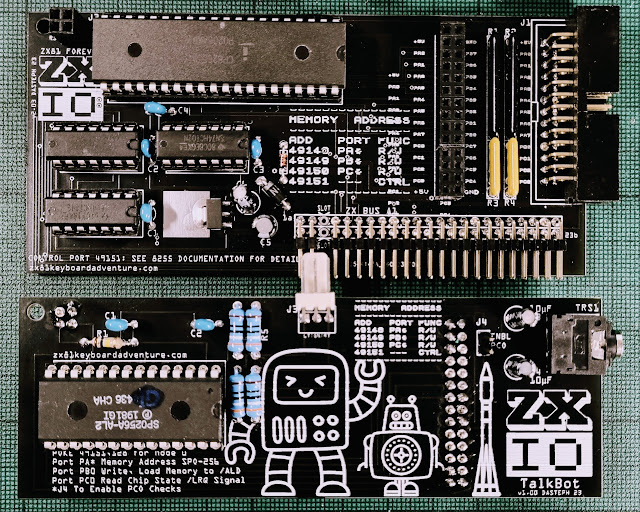
ZX81 ZXIO TalkBot interface and ZXIO Interface
ZXIO-TalkBot and ZXIO V2 (with minor revisions)

ZXIO-TalkBot

Alright, we've got our reliable ZX81 all decked out with the ZXIO V2. Now, let's kick things up a notch - how about introducing an SP0256 (the original retro) speech chip to the party? This little marvel can transform pre-defined sounds (allophones) into speech, bringing a whole new layer of excitement to our setup.


Prior to designing the Talkbot, I made a slight modification to the ZXIO V2 (now V2.1 I guess) board. I introduced a new 4-pin header on the left side of the board, incorporating the NMI, Reset and Clock (foreshadowing)  signals from the ZX81, along with a Gnd line. This addition was made with the anticipation that the extra signals would be beneficial for future expansions. Moreover, the header enhances stability when connecting more extended expansion cards directly to the front of the ZXIO interface.


Of course it's well worth noting that it's quite possible to build an entirely separate / standalone interface board for the SP0256-AL2. When designing the ZXIO-Talkbot, I consulted a number of designs as a reference before planning the ZXIO plugin card. I highly recommend 'How to Make Your Computer Talk' by Steven J. Veltri as an excellent starting point. His book covers interfaces for a number of 80s home computers including the ZX81, along side in depth details on how the SP0256-AL2 itself works.


How to Make Your Computer Talk: T/S 1000, ZX80, and ZX81 Speech Circuit Schematic

The interface circuit from 'How to Make Your Computer Talk' is depicted above. Although as it's designed for Machine Code programs, it is not accessible to BASIC due to the absence of Memory Mapping. However, the fundamental design can be readily adapted for use with the ZXIO expansion card.


In the ZXIO-Talkbot, all addressing and data lines are interconnected with the 8255A on the ZXIO V2 interface card. Consequently, their control is handled in a manner similar to the earlier experiments where we employed the ZXIO V2 to manage an HD44780 LCD board. 


Unlike the 'How to Make Your Computer Talk' board, the clock signal is not produced by a separate 3.12MHz crystal; instead, we utilise the ZX81's own oscillator, which operates at 3.25 MHz—sufficiently close. Additionally, a separate RESET signal is not required; this line is directly connected to the ZX81's RESET. While, in future versions, it could be managed by the 8255A, such a configuration might be considered overkill.
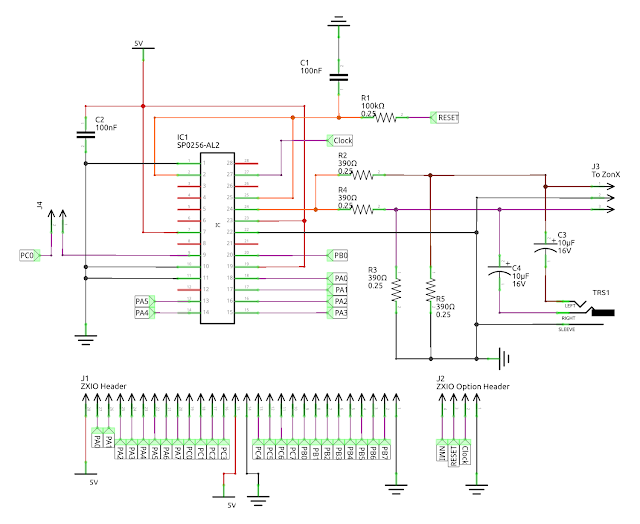

ZXIO TalkBot Schematic, Featuring the SP0256-AL2 Speech Chip


The only other notable difference is the removal of the op-amp. Instead, I've provisioned a 3.5mm headphone jack that's easy enough to connect to powered speakers for all your amplification needs. (Note that there is also a direct connector that goes to my ZonZX-81 sound card.)


Talking the TalkBot

The SP0256 is a speech synthesis chip designed to convert phonetic information into audible speech. It operates by receiving allophone codes, which represent specific variants of a phoneme occurring in particular linguistic contexts. Allophones, unlike phonemes, are concrete variations of sound within a language.


In short, this means that you can't simply give the TalkBot a word and have it 'say' it correctly. Instead, you need to supply it with an allophone list that will hopefully construct a word from its sound samples. Below is a list of allophones, their sound descriptions, and suggested timings that each should be allowed to run.


Unfortunately, the timings are not so useful in ZX81 BASIC, as the instructions take more time to process than desired. Feeding the Talkbot the allophones and ignoring time signatures works sufficiently well. Of course, there's nothing stopping us from addressing the Talkbot/SP0256 later in Assembly for a little more accuracy.


ZXIO SP0256-AL2 Allophones Reference for the ZX81
SP0256-AL2 Allophones Reference

To transmit data to the ZXIO-TalkBot interface we must first configure Port A and Port B on the 8255A IC for output mode. This can be done by POKEing the control register at address 49151 with a value of 128. Once complete, we can begin transmitting control codes. 


The Enable line is first set low on Port B at address 49149, 0, while the allophone control codes are transmitted through Port A at address 49148, 'code'. Then Enable line 1 on port B is set high at 49149, 1. After that, the Enable line is brought low again.


ZXIO-TalkBot and ZXIO V2 interface cards (plus ZX Minstel ZXpand & ZonZX-81)


LCD and TalkBot

The fun doesn't end there; after all, the ZXIO is designed to allow multiple interfaces to be attached simultaneously. As such, we can reuse the LCD interface from the previous project in Part 5, and have it write out what we're asking the ZXIO-TalkBot to say at the same time. For this, we only need to use the upper bits at address 49149 (Port B) to enable and disable its control lines.


ZX81 ZXIO V2 running the LCD and ZXIO-TalkBot Togther Demo 


For your complete audio-visual enjoyment, please play the video below to witness and hear the results. This is just a sample of what could be achieved; the ZXIO V2 Cards and expansions offer almost limitless possibilities. For instance, they could be employed to power a wide array of applications, even extending to interfacing with devices like an Arduino. The potential is expansive, and the video provides just a glimpse of the creative possibilities.


For the moment, that pretty much concludes this mini-series on the ZXIO and ZXIO V2 expansion cards. Further projects based on the board are in the pipeline, and if there's enough interest, I may decide to produce kits and/or complete units. Please let me know if you'd be interested in obtaining a board. If you haven't already, please read over all the related earlier (and future) articles listed below.


See all the other entries for this project:   Part 1Part 2Part 3Part 4Part 5 and Part 6.


Read More